Egyptian Bird Nest Kunafa

Egyptian Bird Nest Kunafa Egyptian Recipe

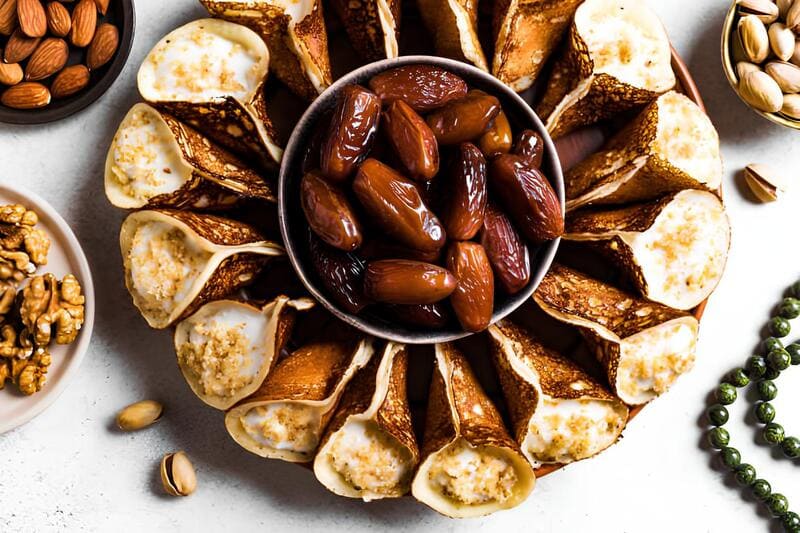
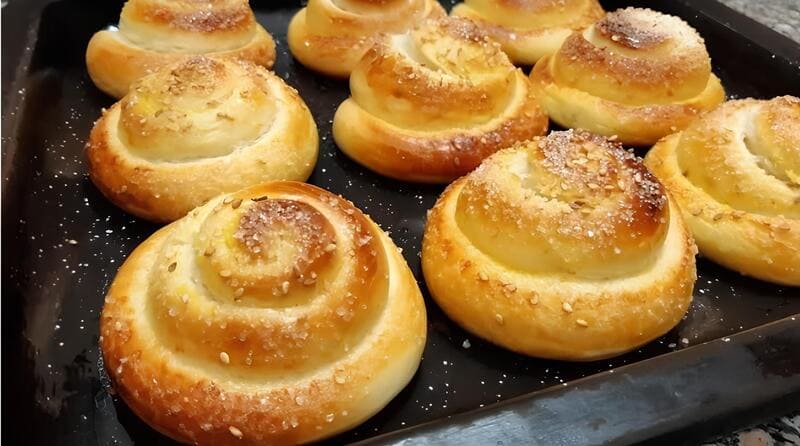
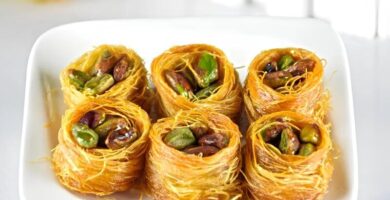
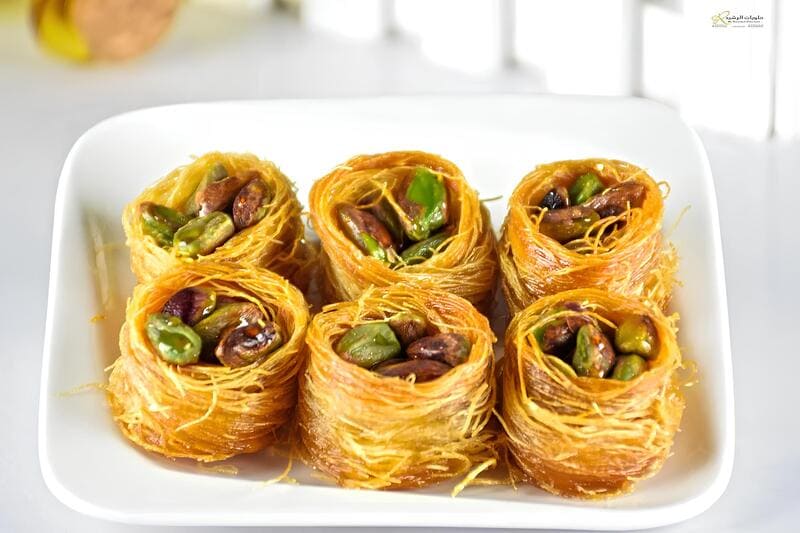
Kunafa is a beloved ingredient in Middle Eastern cuisine, often featured in festive celebrations and family gatherings. In Egypt, one delightful variation is the Bird’s Nest Kunafa with Pistachios. This dessert, resembling a bird’s nest, combines crunchy kunafa with creamy, nutty fillings, delivering both flavor and texture in each bite.

The recipe is not only a treat for adults but also a hit dessert for kids. Its striking appearance and tantalizing flavor make it a favorite at any dinner table. Whether served at special celebrations or simply as a sweet closing to a meal, this Egyptian dessert adds a touch of intricacy and festivity.

Ingredients

  • 2 cups of kunafa dough
  • 1 cup water
  • 1/4 teaspoon of tea for Mondzi (or any preferred tea)
  • 1 cup ground pistachios
  • 1/2 cup free fat or animal ghee (or vegetable ghee for a vegetarian option)
  • 1/4 cup vegetable fat
  • 1 cup sugar syrup (shira)
  • Optional: Assorted nuts for stuffing

Preparation

  1. Combine the water and tea for Mondzi in a saucepan and bring to a boil. Once boiling, simmer on medium heat for five minutes.
  2. Turn off the heat and let the mixture cool. This will be used for flavoring the dessert.
  3. Before using, ensure that your kunafa dough is thawed. Spread it on a clean cloth and cover it to keep it moist.
  4. For the kunafa stuffed with pistachios, take a portion of the kunafa dough and mix in some ground pistachios and optional nuts.
  5. Add a smooth layer of pistachios to the kunafa mixture.
  6. Trim excess edges and fold the corners to secure the filling.
  7. In a baking tray generously greased with ghee, place the filled kunafa.
  8. Brush a quarter cup of vegetable fat on the surface of the kunafa.
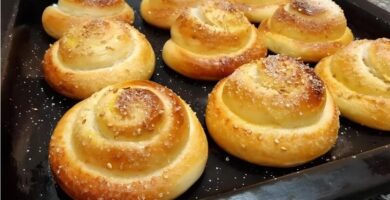
  9. For the bird’s nest variation, take a thin piece of kunafa dough (about 30 cm long) and brush it with vegetable fat.
  10. Coil the dough around your fingers to form a nest shape, ensuring the ends are tucked underneath to keep the shape.
  11. Fill the nests with ground pistachios or any preferred nuts.
  12. Preheat your oven to 220°C (428°F).
  13. Bake the kunafa and bird’s nest pieces until golden on the bottom. Then, turn on the top grill to achieve an even golden color all over.
  14. Once baked, remove from the oven and promptly pour shira over the hot kunafa, ensuring it’s fully absorbed.
  15. Drain excess ghee from the bird’s nests and immediately drizzle shira over them.
  16. Serve hot. Enjoy the crispy, nutty sweetness of this traditional Middle Eastern dessert!

Did you know?

Kunafa is a versatile ingredient widely used across Middle Eastern and Turkish cuisines. In different regions, it might be known as baklava, especially when layered with nuts and soaked in syrup, although there are nuanced differences. This dessert’s beauty lies in its flexible preparation methods, allowing varying tastes and textures—like the chewy and crunchy elements in our bird’s nest version. In Egypt and other Arab countries, kunafa variations may include fillings like cream, cheese, or nuts, each offering a unique flavor profile. Kunafa also holds cultural significance, often enjoyed during Ramadan as a festive treat symbolizing celebration and togetherness. Interestingly, its roots trace back to ancient times, with historical references indicating kunafa’s consumption during the Fatimid Caliphate.

Furthermore, introducing kids to this dessert can be a great way to familiarize them with Arabic culinary traditions. The intricate process of coiling kunafa dough into nests can be a fun kitchen activity, sparking their interest in cooking while enjoying a delicious reward. Whether you’re a lover of traditional Turkish sweets or aspiring to try an exotic Middle Eastern treat, kunafa is a dessert experience like no other!

Qatayef (Egyptian Stuffed Pancakes)

Qatayef Egyptian Recipe

Dating back to the Fatimid era, Qatayef or Atayef is a well-loved Middle Eastern sweet, particularly cherished during Ramadan. This delectable treat consists of pancake-like pastries filled with various ingredients such as nuts, cream, or cheese, then deep-fried until golden and crunchy.

Qatayef offers a delightful textural contrast with its crispy exterior and soft filling. Whether served with a drizzle of honey or a sprinkle of powdered sugar, Qatayef makes for a delightful dessert that pleases both kids and adults alike. The addition of traditional flavors like pistachios and cream makes this pastry truly special.

Ingredients

For the Qatayef Batter:

  • 2 cups all-purpose flour
  • ½ cup semolina
  • 2 tablespoons sugar
  • 1 tablespoon instant yeast
  • 1 teaspoon baking powder
  • 2 ½ cups warm water

For the Filling:

  • 1 cup unsalted chopped pistachios
  • ½ cup sugar
  • 1 teaspoon orange blossom water
  • 1 tablespoon rose water
  • 1 cup unsweetened Chantilly cream or cheese (optional)

For the Syrup:

  • 2 cups sugar
  • 1 cup water
  • 1 teaspoon lemon juice
  • 1 tablespoon rose water (optional)

Frying and Garnishing:

  • Oil for frying
  • Honey or additional syrup for drizzling

Preparation

  1. In a large bowl, whisk together flour, semolina, sugar, yeast, and baking powder.
  2. Gradually add warm water, mixing until a smooth batter forms. Cover and let rest for 30 minutes.
  3. While the batter rests, prepare the syrup. Combine sugar and water in a saucepan and bring to a boil. Reduce heat, add lemon juice, and let it simmer for 10 minutes. Stir in rose water if desired and set aside to cool.
  4. Heat a non-stick skillet over medium heat. Pour small circles of batter to form pancakes roughly 3 inches in diameter.
  5. Cook each Qatayef until bubbles form on the surface and the bottom is golden; do not flip. Remove from skillet and keep covered under a towel to prevent drying.
  6. For the filling, mix chopped pistachios, sugar, orange blossom, and rose water. Alternatively, use Chantilly cream or cheese.
  7. Place a spoonful of filling in the center of each Qatayef. Fold in half and press edges to seal.
  8. Heat oil in a deep frying pan. Fry Qatayef until golden and crispy. Remove and drain on paper towels.
  9. Drizzle with honey or syrup before serving.

Did you know?

Qatayef, also known as Katayef or Asafiri, dates back to medieval times, with roots spreading across the Arab world, from Egypt to Lebanon. Traditionally, this dessert is a staple during the holy month of Ramadan, symbolizing sharing and community spirit. The word ‘Qatayef’ is believed to stem from Arabic, meaning ‘to pick up’ or ‘collect,’ which elegantly describes how diners often hand-pick these treats.

Qatayef can be filled with a variety of ingredients, making it versatile and adaptable to different tastes. From nuts like pistachios and walnuts to creamy fillings like ashta (clotted cream) or Chantilly cream, the possibilities are endless. Additionally, these pastries can be drizzled with honey or sugar syrup, adding a layer of sweetness.

Interestingly, the texture of Qatayef can also vary. While some prefer it soft and soaked in syrup, others enjoy it crispy, making each bite a delightful explosion of flavors and textures. This adaptability ensures that Qatayef remains a beloved and enduring tradition across generations.

So, if you’re looking to indulge in a piece of Egyptian culinary heritage, Qatayef is a must-try, especially during festive seasons or family gatherings.

Egyptian Date Cake (Easy)

Egyptian Date Cake Egyptian Recipe

The Date Cake, known for its rich and moist texture, holds a significant place in Egyptian and Middle Eastern cuisine. This old-fashioned recipe, often enjoyed during the colder months, combines the natural sweetness of dates with the warmth of cinnamon and cardamom, creating an inviting aroma that permeates the home.

This recipe is simple and easy to follow, ensuring even novice bakers can achieve a delectable result. The addition of a homemade toffee elevates the cake, making it irresistibly sticky and delightful. Perfect for family gatherings or as a comforting winter treat, it encapsulates the essence of Arabic hospitality and tradition.

Ingredients

For the Toffee

  • 1.5 cups sugar
  • 50 grams butter
  • 250 grams sweet cream
  • 0.5 tsp sodium bicarbonate (baking soda)

For the Cake

  • 11 dates, pitted
  • 1 cup hot water
  • 0.5 tsp sodium bicarbonate (baking soda)
  • 4 eggs
  • 1 tsp vanilla powder
  • 1 cup sugar
  • 0.75 cups vegetable oil
  • 0.5 cups warm milk
  • 2.5 cups flour
  • 3 tsp baking powder
  • 0.25 tsp salt
  • 1.5 tbsp cinnamon
  • 1 tsp ground cardamom
  • 0.5 cups finely chopped walnuts
  • Extra flour and ghee (or vegetable oil) for greasing the mold

Preparation

  1. To make the toffee, heat 1.5 cups of sugar in a pot over high temperature. Shake the pot occasionally until the sugar begins to liquefy, then reduce the temperature to medium and continue stirring until fully melted.
  2. Add 50 grams of butter to the melted sugar, stirring continuously to avoid lumps.
  3. Gradually add 250 grams of warm sweet cream, stirring until the mixture is well combined.
  4. Add 0.5 tsp of sodium bicarbonate to the toffee mixture and keep stirring as it boils. Remove from heat and let it cool.
  5. To prepare the dates, pit 11 pieces and soak them in 1 cup of hot water mixed with 0.5 tsp of sodium bicarbonate.
  6. In a separate bowl, whisk 4 eggs with 1 tsp of vanilla powder and 1 cup of sugar at low speed, increasing it until the mixture is creamy. The eggs should be at room temperature.
  7. Add 0.75 cups of vegetable oil and continue whisking, followed by 0.5 cups of warm milk. Whisk for another minute.
  8. In another bowl, sift 2.5 cups flour, 3 tsp baking powder, and 0.25 tsp salt. Add 1.5 tbsp cinnamon and 1 tsp ground cardamom to the dry mixture.
  9. Blend the soaked dates until smooth and add to the egg mixture. Whisk together for one minute.
  10. Gradually add the dry ingredients to the wet mixture, mixing in batches. Fold in 0.5 cups of finely chopped walnuts.
  11. Grease a cake mold with ghee or vegetable oil and lightly flour it. Pour the batter into the mold.
  12. Bake the cake in a preheated oven at 180°C (350°F) for 45 minutes. Check for doneness before removing from the oven.
  13. Allow the cake to cool for 10-15 minutes, then serve with the cooled toffee and additional walnut garnish if desired.

Did you know?

The Date Cake, also known as “Lebanese date cake” or “Middle Eastern sticky date cake,” is a beloved dessert across the Arabic-speaking world. Dates, one of the primary ingredients, have been a staple in the Middle Eastern diet for thousands of years, symbolizing hospitality and prosperity. These fruits are rich in fiber, vitamins, and natural sugars, making them a nutritious sweetener.

Cardamom and cinnamon, often used in this recipe, were historically prized for their medicinal properties and ability to preserve food. The toffee, with its origins in Arabic cuisine, adds a modern twist, enhancing the cake’s moist and sticky texture. This cake is not only a treat but also a testament to the region’s rich culinary heritage, merging ancient ingredients with contemporary baking techniques. Sharing this cake is a way to connect with the rich tapestry of Egyptian and Middle Eastern culture.

Sweet Bread Rolls (Shoreek)

Sweet Bread Rolls Egyptian Recipe

Every culture has its own unique take on yeast rolls, and Egyptian Shoreek is no exception. These sweet bread rolls offer a soft, delightful treat perfect for dinner or as a snack. Their unique flavor profile, attributed to a hint of vanilla and a sprinkle of sanding sugar, makes them stand out among traditional bread rolls.

Shoreek is a beloved treat in Egypt, often enjoyed with a cup of tea or coffee. These rolls are quick and easy to make, yet are considered some of the best homemade bread options you can serve. The combination of a soft interior with a slightly crisp exterior offers a perfect texture that everyone will love.

Ingredients

  • 2 cups all-purpose flour
  • 1/3 cup sugar
  • 1 teaspoon baking powder
  • 1 tablespoon dry yeast
  • 1/8 teaspoon salt
  • 1/4 cup melted butter
  • 1 beaten egg
  • 1/2 teaspoon vanilla
  • 1 cup warm milk (use between 3/4 cup to 1 cup as needed)
  • Additional flour for kneading (if necessary)

For the glaze

  • 1 egg
  • 1 tablespoon milk
  • 1/8 teaspoon vanilla
  • Sanding sugar (optional)

Preparation

  1. Mix together the 2 cups of all-purpose flour, 1/3 cup sugar, 1 teaspoon of baking powder, 1 tablespoon of dry yeast, and 1/8 teaspoon of salt in a bowl.
  2. In another bowl, mix the 1/4 cup melted butter, 1 beaten egg, and 1/2 teaspoon vanilla.
  3. Combine the wet ingredients with the dry ingredients.
  4. Gradually add the warm milk (3/4 cup to 1 cup) into the mixture, stirring lightly to form a sticky batter.
  5. Transfer the batter into a greased bowl, cover, and let it rise for two hours.
  6. After the dough has risen, sprinkle about 1 cup of flour on a surface and knead the dough lightly if the batter is too sticky.
  7. Divide the dough into six equal pieces.
  8. Roll each piece into a 12-inch-long rope, then shape each rope into a coil and tuck the end underneath.
  9. Place the shaped dough pieces onto a cookie sheet lined with parchment paper.
  10. Cover with plastic wrap and let them sit for 10 minutes.
  11. For the glaze, beat 1 egg with 1 tablespoon of milk and 1/8 teaspoon of vanilla. Brush it over the rolls and sprinkle with sanding sugar if desired.
  12. Bake in a preheated oven at 350°F and check after 12 minutes. They usually bake between 15 and 20 minutes.
  13. Let the bread sit for about five minutes before serving.

Did you know?

Shoreek is not just popular as a simple bread roll but also holds cultural significance in Egypt. Often enjoyed during festive occasions, this sweet bread roll is akin to comfort food for many Egyptians. The vanilla glaze that tops these rolls helps them achieve a golden-brown hue and adds a subtle, aromatic sweetness.

The use of yeast in Shoreek plays a crucial role in creating the soft, fluffy texture. Yeast fermentation produces carbon dioxide, which causes the dough to rise, giving these rolls their airy interior. Interestingly, the process of letting the dough rest for two hours allows the yeast to fully activate and helps in achieving the desired softness.

In various parts of Egypt, you might find Shoreek flavored with different spices like anise or enhanced with a touch of honey, demonstrating the versatile and adaptable nature of this traditional recipe. Whether you serve these rolls at dinner or enjoy them as a quick snack, their homemade charm is undeniable.

Egyptian Banana Milkshake (Easy)

Egyptian Banana Milkshake Egyptian Recipe

Banana milkshake, or smoothie, is an Egyptian staple enjoyed by many. This simple yet healthy drink offers a creamy blend of ripe bananas and sweet syrup, perfect to start your day with a burst of energy. Providing benefits that include vitamins and minerals, this milkshake is both delicious and nutritious.

This easy recipe can be made in no time, making it an ideal choice even for those with busy mornings. Not only does it keep the calories in check, but it also offers a taste of tradition that’s hard to resist. Let’s uncover how to make the best Egyptian banana milkshake!

Ingredients

  • 2 ripe bananas
  • 1 cup cold milk
  • 1 tablespoon sugar or honey
  • 1 teaspoon vanilla extract
  • Ice cubes (optional)

Preparation

  1. Peel and chop the bananas into smaller pieces.
  2. Add the chopped bananas, cold milk, sugar or honey, and vanilla extract into a blender.
  3. Blend the ingredients until smooth and creamy.
  4. If you prefer a colder drink, add a few ice cubes and blend again until the ice is crushed.
  5. Pour the banana milkshake into a glass and serve immediately.

Did you know?

The origin of the banana milkshake in Egyptian cuisine likely stems from the ancient tradition of incorporating locally grown ingredients into refreshing beverages. Bananas are a rich source of potassium and vitamin C, making them incredibly beneficial for maintaining good health. Often enjoyed as a smoothie, this drink is known for its simplicity and versatility. Swap out milk with almond or oat milk for a dairy-free alternative, and it’s just as delicious.

The syrup used can vary, with some opting for honey instead of sugar for a natural sweetness. With a low calories count, this milkshake doesn’t just satisfy your taste buds; it’s also a fantastic way to enjoy a filling drink without guilt. The best part about this recipe is how incredibly easy it is to adapt to your preference—add a touch of cinnamon for an extra flavor twist, or blend in other fruits for a nutrient-packed smoothie experience.

Egyptian Shatta (Spicy Chili Sauce)

Egyptian Shatta Egyptian Recipe

Egyptian Shatta, also known as spicy chili sauce, holds a special place in the hearts of spice lovers. This piquant condiment traces its roots back to ancient Arabic culinary traditions, enhancing a variety of dishes with its fiery kick.

The flavor profile of Egyptian Shatta is robust, featuring a harmonious blend of smoky, tangy, and savory notes. Made primarily from hot red peppers, this sauce is a versatile addition to any meal, perfect for those who crave an authentic Egyptian touch in their cuisine.

Ingredients

  • 1 kilogram of hot red peppers
  • 1/4 cup vinegar
  • 4 tablespoons minced garlic
  • 2 tablespoons salt
  • 1 tablespoon paprika
  • 1 tablespoon cumin
  • 1 tablespoon coriander
  • 1/2 cup water from boiled peppers
  • 2 tablespoons olive oil or corn oil (for preservation)

Preparation

  1. Wash and drain the red peppers thoroughly. Remove the pepper heads, taking care to wear gloves to avoid burns.
  2. Boil a pot of water and add the peppers for a quick five-minute blanching.
  3. Drain the peppers and let them cool.
  4. Transfer the cooled peppers to a blender, add minced garlic, salt, paprika, cumin, coriander, and half a cup of the pepper boiling water.
  5. Blend until a smooth, thick paste forms.
  6. Add additional water if needed to achieve the desired consistency.
  7. Transfer the Shatta to a jar and top with two tablespoons of olive oil or corn oil to preserve freshness.

Did you know?

Egyptian Shatta isn’t just a modern-day favorite; it has a rich history dating back to ancient times. The use of hot peppers in Arabic cuisine is centuries old, linked to spice routes that brought diverse flavors from South Asia and the Americas. Shatta provides a hot and vibrant addition to dishes such as baba ghanoush, tahina, and grilled meats, transforming simple meals into gourmet experiences.

Interestingly, while Shatta is traditionally made with hot red peppers, variations include adding milder peppers to balance the heat. It’s not just a condiment but a seasoning that can be incorporated into marinades for fish, chicken, and even eggplant dishes. Preservation methods, like adding a layer of oil on top, allow this spicy sauce to stay fresh for over a year without refrigeration, echoing ancient practices of prolonging the shelf life of homemade sauces.

Thus, Egyptian Shatta isn’t merely a hot sauce; it’s a historical journey of flavors, a nod to the ingenuity of ancient culinary arts, and a versatile staple in Egyptian cuisine.

Onion Garlic Tomato Sauce (Easy)

Onion Garlic Tomato Sauce Egyptian Recipe

The Onion Garlic Tomato Sauce (also known as Egyptian Magic Sauce) is a staple in many Egyptian households, known for its zesty and tangy flavor profile. This sauce is an excellent accompaniment to a variety of dishes, adding a burst of freshness and a hint of spice with every bite.

In Egyptian cuisine, blending simplicity with robust flavors is a hallmark, and this sauce is no exception. Made with fresh, locally sourced ingredients, it’s both quick to prepare and deeply satisfying. The unique method of hand-mixing the ingredients ensures a delightful texture and preserves the sauce’s vibrant, all-natural color.

Ingredients

  • 4 pieces tomatoes
  • ½ lemon
  • Chopped coriander
  • ½ small chopped onion
  • Salt to taste
  • Black pepper to taste
  • 1 tablespoon olive oil

Preparation

  1. Grill the tomatoes until soft and slightly charred. Allow them to cool, then remove the peel.
  2. Squeeze the peeled tomatoes into a bowl, discarding any excess liquid.
  3. Add the chopped onion, coriander, and the juice of half a lemon to the bowl.
  4. Optionally, add some chopped red or green pepper for extra spice.
  5. Add salt and a spritz of black pepper to taste.
  6. Drizzle in the olive oil.
  7. Use your hands to mix the ingredients together until they reach a liquid consistency. Enjoy!

Did you know?

Tomatoes are a relatively modern addition to Egyptian cuisine, having been introduced to the region in the 19th century. Despite their late arrival, they’ve become an integral component in various traditional dishes. Interestingly, the method of hand-mixing the sauce helps keep the natural color and texture intact, which is why you’ll notice a difference if you opt to blend it.

Egyptian street vendors often use variations of this sauce to flavor shawarma and falafel. In keeping with its reputation as an “Egyptian Magic Sauce,” this recipe can be adapted in numerous ways to suit different tastes. For a smokier flavor, try grilling the onions and peppers along with the tomatoes.

Also, feel free to adjust the levels of coriander and lemon to create a balance that suits your personal preference.This sauce isn’t just versatile; it’s a testament to the adaptability and richness of Egyptian culinary traditions.

Ashta Cream (Easy)

Ashta Cream Egyptian Recipe

Celebrated for their lush texture and versatile usage, Ashta cream—also known as qashta or qeshta—is a cornerstone of Middle Eastern desserts. Revered during festive seasons like Ramadan, this thick, clotted cream is an essential layer in many Arabic sweets, bringing a rich, creamy experience to delights such as baklava and kunafa.

This homemade Ashta cream version is simple yet profoundly satisfying. Its recipe uses common kitchen staples, ensuring accessibility. Much like a symphony, each ingredient contributes its unique notes, culminating in a harmonious, creamy concoction. This recipe offers a delightful balance of textures and flavors, encouraging you to explore the delicious landscape of Egyptian desserts.

Ingredients

  • 1 liter of milk
  • 2 tablespoons vinegar
  • 2 tablespoons cornstarch
  • 2 tablespoons flour
  • 1 tablespoon butter
  • ½ teaspoon mastic (optional)
  • Water (as needed)

Preparation

  1. Heat the milk in a large pot over high heat until nearly boiling.
  2. Add the vinegar to the pot and stir until the milk curdles and separates into solids and whey.
  3. Allow it to boil slowly for 5 minutes, then strain the curds using a cheesecloth or fine strainer.
  4. In a separate saucepan, mix the strained curds with the cornstarch and flour.
  5. Gradually add the milk while stirring continuously over medium heat until the mixture thickens.
  6. Remove from heat once the mixture reaches a thick, creamy consistency.
  7. Stir in the butter and finely crushed mastic, if using, until fully incorporated.
  8. Spread the mixture in a tray, cover, and let it cool to room temperature before refrigerating for at least an hour.

Did you know?

The origins of Ashta cream stem from centuries-old traditions in the Middle East, where it has been a luxurious topping or filling in numerous pastries. Known as “qeshta” in Egyptian and Levantine cuisines, this cream is distinct from Western equivalents due to its unique preparation methods. The process of curdling milk with vinegar to create this thick layer is akin to making clotted cream but imbued with regional nuances.

When it comes to cultural significance, Ashta cream is indispensable during religious celebrations such as Ramadan. It is generously layered in sweets like Kunafa and Othamaliyah, each bite evoking communal warmth and festive spirits. As for its versatility, besides being a part of intricate desserts, Ashta cream can also be a simple yet indulgent topping for fruits, adding a creamy contrast.

Interestingly, the caloric content of Ashta cream can vary widely based on how it’s prepared or used. While indulgent, there are ways to prepare a more healthy version by adjusting the amount of butter or using low-fat milk. Nevertheless, this delightful cream remains a beloved staple in Middle Eastern households, contributing a rich and irresistible flavor profile to any dish it graces.

Msemen Or Rghaif

Msemen Or Rghaif Egyptian Recipe

Msemen, also known as Rghaif, is a beloved Moroccan and Algerian flatbread. Traditionally enjoyed for breakfast, it’s a quintessential part of Maghrebi cuisine, showcasing the region’s knack for turning simple ingredients into delightful dishes. This layered, crispy bread is often served with honey or cheese, adding a touch of sweetness or savory to the meal.

The artistry of Msemen lies in its texture and flavor. With layers upon layers of thin, buttery dough, each bite reveals a unique combination of crispy exterior and soft interior. Simple to prepare yet deeply flavored, this flatbread represents the warmth and tradition of North African culinary heritage.

Ingredients

  • 250g Fino flour or semolina
  • 250g all-purpose flour
  • 1 tsp salt
  • Lukewarm water, as needed
  • Vegetable oil, for brushing
  • Melted butter, for spreading

Preparation

  1. In a large plate or a Moroccan Gasaa, place the Fino flour or semolina.
  2. Add the all-purpose flour and salt, mixing all ingredients together.
  3. Gradually add lukewarm water, mixing continuously until a dough ball forms; it should be neither too moist nor sticky.
  4. Knead the dough with your fists and palms for 10 minutes, until smooth and elastic.
  5. Brush the dough with a small amount of vegetable oil.
  6. Cover with a clean cloth and let rest for 20 minutes.
  7. Brush the rested dough again with vegetable oil.
  8. Grasp portions of the dough and cut into tennis ball-sized balls with your thumb and index fingers.
  9. Lightly brush dough balls with vegetable oil, cover with a clean cloth and let rest for 15 minutes.
  10. Brush your work surface with vegetable oil, take one dough ball and flatten with your palm.
  11. Using your fingers, gently expand it into a very thin disk.
  12. Spread a bit of melted butter over the dough, sprinkle with Fino flour or semolina.
  13. Fold the upper edge towards the center, add more melted butter.
  14. Fold the lower edge towards the center, add more melted butter, sprinkle with semolina again.
  15. Fold right and left edges towards the center to form a square.
  16. Flatten the dough square with your fingers and palm to make it three times larger, spread some melted butter.
  17. Heat your pan on high heat, then reduce to medium-high.
  18. Cook Msemen on both sides for a few minutes each, turning several times until golden brown and cooked through.
  19. Serve immediately with honey, cheese, or any toppings of choice.

Did you know?

Msemen can be transformed into a stuffed version, often referred to as “Msemen Mahshi.” It’s typically filled with a savory mixture of onions, spices, and occasionally minced meat, making it a hearty option for any meal. The versatility of Msemen extends beyond its traditional breakfast role; it can be an appetizer, side dish, or even a main course depending on the stuffing.

In Egyptian cuisine, though less common, variations similar to Msemen exist, highlighting the interconnectedness of North African culinary traditions. Preparing Msemen is considered an art in many Moroccan households, showcasing the cook’s skill and attention to detail. So, whether you’re mastering the art of making Msemen or enjoying its delicious layers, you are participating in a rich culinary history that spans generations and borders.

Harcha (Semolina Bread)

Harcha Egyptian Recipe

Harcha is a beloved semolina bread from Morocco, often enjoyed during breakfast or as a snack with tea. Its unique texture comes from using fine semolina, which gives it a gritty yet soft mouthfeel. While Moroccan in origin, its versatility makes it a favorite across North African countries, including Egypt.

This bread is especially loved for its simple preparation and delicious flavor, making it a healthy and satisfying choice for many. Traditionally, harcha is lightly sweetened, but you can easily modify it with savory fillings or toppings. Whether you prefer it plain or with additions, harcha remains an easy, traditional recipe that captures the essence of Moroccan and Egyptian culinary traditions.

Ingredients

  • 500 grams fine semolina
  • 7 grams dry yeast
  • 80 milliliters oil (mix of vegetable oil and butter)
  • 1 teaspoon salt
  • 1 teaspoon sugar
  • 250 milliliters warm water
  • Extra semolina for dusting

Preparation

  1. In a large mixing bowl, combine 500 grams of fine semolina, 7 grams of dry yeast, 1 teaspoon of salt, and 1 teaspoon of sugar.
  2. Add 80 milliliters of oil (a mix of vegetable oil and butter) to the dry ingredients and mix well until fully incorporated.
  3. Gradually add 250 milliliters of warm water, stirring continuously to form a soft dough.
  4. Cover the bowl with a cloth and let the dough rest for 30 minutes to allow the yeast to activate.
  5. Dust your hands with semolina and divide the dough into small balls.
  6. Heat a heavy frying pan over medium heat.
  7. Flatten each dough ball slightly and dust it with extra semolina.
  8. Cook each piece in the frying pan until golden brown and crispy on both sides, about 4-5 minutes per side.
  9. Remove from heat and let cool slightly before serving.

Did you know?

Harcha is often enjoyed with honey and butter, a flavor profile that complements its mild, slightly sweet taste. This bread dates back centuries and has been a staple in Moroccan households, passed down through generations. The key ingredient, semolina, is a coarse flour made from durum wheat, which is also used for making couscous and pasta.

Interestingly, harcha can also be made in various shapes and sizes, from small snack-sized pieces to larger loaves. In some regions, it’s cooked on a griddle, imparting a slightly different texture. It’s also adaptable to your dietary preferences—whether you’re looking for a gluten-free option or a vegan version, the basic recipe can be easily tweaked.

Harcha’s best companion is often Moroccan mint tea, providing a refreshing contrast to its hearty texture. It’s also worth noting that this bread is not just limited to Moroccan cuisine; its influence extends to Egyptian culinary practices, showcasing the shared love for traditional semolina-based recipes.